Enchanted by Sewing, The Podcast

Enchanted by Sewing,  The Podcast
An audio extension of my regular blog, Me Encanta Coser/Enchanted by Sewing (http://MeEncantaCoser.blogspot.com)
Showing posts with label muslin. Show all posts

Monday, February 15, 2016

Cutting Out Aurora - The Princess-Seamed Test Garment

Dear Susan,

More progress on that princess-seamed shirt muslin (M6076)  ...
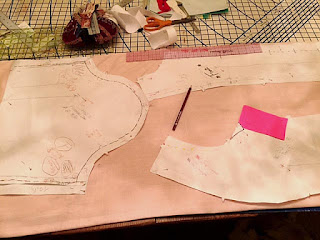
You and I talked last week, about the troublesome set in sleeves on my muslin. Too tight across the bicep, funny wrinkles in both front and back. You so kindly looked up an article for me as we talked about how I might redraft the sleeve pattern.

Did I read that article? Oh, after you spend time searching it out, I didn't!!!! Instead I realized that I was just so tired of putting my minimal sewing time into muslin work. I wanted to be able to get on with garment sewing - even if it wasn't believing I had a perfect pattern to use for my beautiful piece of Poppy and Honesty Liberty of London Tanna Lawn.

So I simply tried another sleeve - the one we drafted for our slopers, in sloper/moulage class. And you know, it just looked close enough for government work, when I safety pin basted the sleeves in. I had the full rotation for arm movement I needed, and didn't see funny pinches and wrinkles in the bodice. So I went ahead and cut out a test garment - Aurora - a 2 yard, 5 inch remnant from my fabric inventory. Aurora will serve the dual purpose of muslin - getting the sleeves working, and a garment I can wear. 

The garment is the story isn't it? And there comes a point when, I just want to quit drafting the tale, finish the editing, and get it out for reading.

http://www.ikatbag.com/2014/03/subtelties-in-drafting-sleeves.html

Saturday, January 16, 2016

I gotta remember to Stay-Stitch those sleeves! Muslin: M6076 - Princess Seamed Shirt - Pattern Work


I cut out the muslin for this princess-seamed shirt a while back. It's the same pattern, M6076, I first started using to create my sleeveless Western Winds shirt back in the early fall. Now I'm continuing to create a sleeved version. This pattern has multiple princess-seamed options (a princess-seam can end up in different spots on the garment) and lots and lots of instruction sheet ideas for getting a good fit. A really good basic pattern.

I'm not instruction sheet oriented - so I have a tendency to forget about stay-stiching! And then I wonder why the sleeve stretches out of shape when I go to set it in! Same deal with other curved seam areas. And it's particularly important when I'm creating a muslin/toile - because this is the time for getting the seams to come together right .

Set in Sleeve test - the outer line is stay-stitching (regular stitch line).
The inner line is a basting stitch for easing or setting the sleeve cap into the
armscye (the curved opening in the bodice)
I added two tucks in the front of the sleeve cap, because after I measured the alterations to the bodice (the armscye line), 
I found that there was too much sleeve cap. I want only about 3/4" more in the sleeve cap, than in the armscye. Also I took note
as to the center of the sleeve - so I only altered the front, the back looks like it has about the right amount of extra.

I must admit, this is not exciting sewing. In the past I always just went ahead and sewed up a pattern and hoped for the best. But I've learned the value of a well fitting pattern. It means I'll get this one pattern working for me - and then I can just zip through future versions, knowing they'll look and fit great and I'll reach into the armoire for them again and again.

I added a one inch seam allowance for fitting a muslin/toile.
Learned this from Lynda Maynard.
I used a double Clover tracing wheel for this - it has two heads.


Sunday, November 29, 2015

Pattern Work - Working For My Plaid - M6076 Princess Seamed - With Sleeves

Can't you just envision these pattern pieces and muslins as a red-plaid princess-seamed shirt?
In the November episode of the Enchanted by Sewing audio/pocast, I talked about sewing tartans and plaids. I also mentioned I have plans for a new red plaid, princess-seamed shirt, using M6076. As you may have noticed in my recent postings, Jasper-the-new-pooch has been sewing my slow sewing down even more. Still, I have gotten in some pattern work!


All four pattern pieces have a muslin attached. My next step is to transfer the seam lines onto the muslin, before I begin basting.

 I drew those seam lines  onto the pattern, based on the measurements I took from the sleeveless Western Winds shirt, which I created from this same pattern (altering to create a sleeved version as well as getting a good fit for me). I've really enjoyed wearing Western Winds and got quite a lot of late summer/early fall use out of that shirt - of course here in California it stays warm longer than much of the U.S.

For Western Winds, I cut back the top of the shoulder towards the neck, but I've dropped that back in place for this sleeved version. My new pattern includes lines for both sleeved and sleeveless versions. I  cut with room for either version, then use my clover wheel to lay down the armscye lines, then cut away what I don't need for the particular version I'm making. 

For more description, see my previous post- Sleeved to Sleeveless.

There's a good chance I'll be making a few more changes to the muslin, and therefore pattern, before I snip into that red plaid. I also plan to re-test the new pattern on another sleeveless version, sometime over the next few months. Tried and true patterns take a while to get just so, but they sure are worth their weight in gold.
I store in-progress muslins and pattern pieces clipped onto binder clips  hanging off cup hooks. That way they don't get wrinkles in between sewing sessions, and they all stay together.